Categories
eCommerce

How to Keep Your WooCommerce Site Secure

If you run a WooCommerce store, then security should be a top priority. Your eCommerce store will contain information on your customers, transaction details, and lots more. You must be proactive about protecting this data, your site, and WooCommerce security in general.

WooCommerce employs a team of experts who focus solely on security, ensuring that the WooCommerce plugin is kept up to date and that vulnerabilities aren’t easily exploited. However, if you want to keep your WordPress WooCommerce site safe and secure you will need to implement your own security measures too.

In this article, we will share actionable tasks that you can implement to help improve your WooCommerce security. These include a look at hosting, WordPress security plugins, SSL certificates, the use of PayPal, and many more tips and tricks.

Select a Secure Hosting Provider

SiteGround

Hosting can range in price, but generally, the rule here is the more you pay the better the service. Quality hosting, that includes top-notch security protection, can help keep your site safe, saving you severe headaches down the line.

When selecting a hosting provider, always opt for one that provides extensive security features. These should include automatic updates, frequent backups, multiple firewalls, and malware scans. Ecommerce or WordPress specific hosting service is also worth considering.

SiteGround offers high-performance WooCommerce hosting. They use proactive security methods, provide impressive 24/7 support, have free SSL included, and is PCI compliant. These are all important features for a WooCommerce store, and therefore will help provide an extra layer of security for your WordPress site.

Use a Security Plugin

WordFence

Using a WordPress security plugin is an easy but extremely effective way to improve your WooCommerce security. A quality security plugin will protect your site against malware threats and attacks.

Wordfence is a WordPress specific security plugin that provides up to the minute security defense. Here are just some of its security features:

  • A Malware Scanner checks your site’s security hasn’t been breached.
  • The Firewall works to prevent malicious attacks.
  • The real-time Threat Defence Feed is constantly updated, helping to identify known and new threats.
  • Brute force attacks are monitored and blocked, helping limit login attempts and secure your login process.

This proactive approach to reducing security threats means that your WordPress WooCommerce store will be less likely to fall prey to security attacks.

Secure Your Login and Passwords

It is important that you take the necessary steps to secure your admin and other user accounts, as this can be an area of high vulnerability.

Use 1Password to Keep Usernames and Passwords Safe

1Password

If you are running an online store, always change your username to something other than ‘admin’, and use a complex password. This will help prevent your username and password being easily discovered and your site being compromised.

However, remembering an elaborate login sequence can be difficult for many of us. 1password is a great solution to the difficulty of creating, remembering, and changing passwords. Let 1password generate and store a strong and unique password for your WooCommerce site, to help you log in easily, and keep hackers out.

Setup Two Step Authorization

Clef

Using a two-step authorization to log into your WordPress WooCommerce site is another way to improve security. Adding the extra dimension of verifying your login on another device, usually your smartphone, provides an extra barrier of defense.

Two Step authorization is available if you upgrade to Wordfence Pro. However, if you are looking for a free option then Clef Two-Factor Authentication may be just what you need. Instead of using a password, Clef uses cryptography, so you can log into your WooCommerce site using just your smartphone. This is an effective way to protect your site against hackers.

Limit Login Attempts

Jetpack

Brute force attacks are becoming more and more frequent. Therefore, it is important to protect your site against them. As mentioned earlier, Wordfence includes brute force protection as one of its many features. However, if you don’t run Wordfence on your site, then there are numerous other plugins you can use.

Jetpack’s module Protect enables your site to automatically block any unwanted login attempts. This is one of Jetpack’s many free and efficient modules that will quickly and easily help secure your WooCommerce site.

Tips for WordPress Themes and Plugins

To keep your WordPress site vulnerabilities at a minimum, it is important that you implement any theme and plugin updates. The newest versions of themes, plugins, WooCommerce core, and WordPress itself are the safest, so always update as soon as possible.

Equally, only ever download themes and plugins from reputable sources. Also, delete any that you are no longer using from your WordPress website. By keeping on top of updates and plugins, your site will be less likely to be compromised.

Obtain an SSL Certificate

WPEngine

Secure Sockets Layers (SSL) allows sensitive information to be transferred securely between a web server and a browser, via an encrypted connection. The majority of WooCommerce stores deal with valuable private customer and payment information. Therefore, it is crucial that this is kept safe. By using SSL, your site will be loaded over HTTPS, helping protect your customer data.

The hosting company WPEngine has recently started to provide free SSL certificates if you sign up to their hosting service. This means that your site’s connections are much more secure, helping keep your visitor’s information safe. SSL also has the added benefits of improving SEO, while reassuring customers that they are purchasing from a reputable company.

Take Payments via PayPal

Paypal

If your WooCommerce store is just starting out or is still a small operation, then it may be worth running all payments directly through PayPal. Although this won’t necessarily make your site safer, it will help secure the payment process for your customers.

Using Paypal to take payments means that all visitor data will be managed and stored by PayPal. Keeping customer data secure is, therefore, PayPal’s responsibility, and one less thing for you to worry about. Seeing the PayPal log can also provide some reassurance to your customers, as it’s such a well-known payment system.

Invest in a Good Backup Plugin

Backup Buddy

As well as improving your WooCommerce security, another essential task is to back up your site and its data. You stand the chance of losing everything if the worst does happen and your site is hacked. That is unless you’ve backed up your site.

BackupBuddy is an impressive plugin that can back up your entire WordPress WooCommerce site. Backups can be scheduled to run at set intervals, and backup files are saved in a safe offsite location. If you need to restore your site, this can be done quickly and easily, so your eCommerce store won’t lose too much time and money.

What If Your Site Gets Hacked?

Sucuri

What if your WooCommerce site gets hacked and fixing it is beyond your skill set? Don’t worry, Sucuri Security provides a clean-up and repair service, removing malware, infections, and lots more. This service isn’t cheap. However,  a clean WooCommerce store that can offer a safe and secure customer service, is more than worth it.

Final Thoughts

A successful WooCommerce website needs to be able to generate lifelong customers. By building a safe and trustworthy WordPress site, users will feel confident to buy from your store, helping to increase your revenue. Not only that but focusing on WooCommerece security can help avoid many headaches down the line.

To keep your WooCommerce security up to date and healthy, you need to be proactive. Don’t sit back and wait for the malware to come to you. Implement as many of the strategies mentioned as you can, and make security a priority for your WordPress website.

What actions do you need to take to make your WordPress WooCommerce site safer? Please share in the comments below…

Categories
eCommerce

How to Build an eCommerce Store For Free with WordPress and WooCommerce

Setting up an online store with WordPress is very easy and best of all it can be done for free. I should point out there are some upfront costs involved, such as registering a domain name and getting a hosting account. However, the process of turning an existing self-hosted WordPress site into an eCommerce store can be achieved without any additional financial outlay.

By following this guide you will be able to add eCommerce functionality to your WordPress site and start an online store today.  If you are yet to setup a WordPress site of your own, please check out our guide to installing WordPress.

Choosing an eCommerce Plugin

In order to enable your WordPress site to function as an online store, you are going to have to install a plugin. There is a handful of leading free eCommerce plugins for WordPress and for this guide we are going to be using WooCommerce.

Why WooCommerce? It’s a very robust, powerful and easy to use eCommerce toolkit for WordPress, making it a good choice for beginners and expert users alike. This free plugin been developed by the WooThemes team and there are many additional addons available to enhance both the plugin itself and your online store. These complimentary addons are created by the plugin’s developers and third parties. They include features such as:

  • Integration with additional payment processing services,
  • Advanced product shipping management
  • Create products with recurring payments
  • Advanced reporting
  • Bulk product imports

To view the many extensions available for WooCommerce visit the store.

The downside of WooCommerce is that although the plugin is free, if you want to add more features to your store, there is a good chance you may have to pay for an additional extension or plugin to bring the desired functionality to your site. However, the free version has everything needed to begin selling items online from your WordPress site.

Building an eCommerce Store with WooCommerce

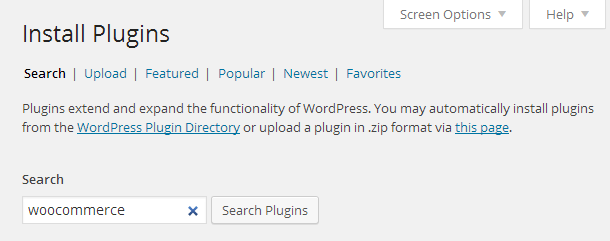
The first step is to install the free WooCommerce plugin on your site. The easiest way to do this is to login to your WordPress admin area and then go to Plugins > Add New on the admin sidebar menu.

Install WooCommerce

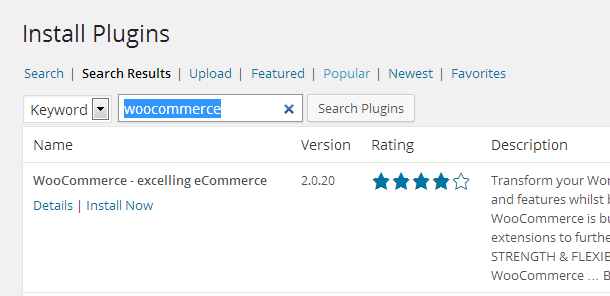
Then perform a search for the term ‘woocommerce’. There will be a lot of results returned but the plugin we are looking for should be listed first and will look like this:

Install eCommerce Plugin

Click on ‘Install Now‘, and then ‘Activate Plugin’ on the next screen. Once the plugin is installed and activated, it will prompt you to do a couple of things. The first is to create the necessary pages for your online store. To do this, simply click on the ‘Install WooCommerce Pages’ button and they will be created for you.

WooCommerce Install Pages

Theme Issues

At this point you may see a message notifying you that ‘Your theme does not declare WooCommerce support’.

Depending on the WordPress theme in use, this might be a problem or not. If you are starting a new site, a quick way to rectify this is to activity the free ‘Twenty Twelve’ theme which should be installed on your site.

To do this go to Appearance > Themes and then look for a theme called Twenty Twelve and click ‘Activate’. If it’s not there, click on ‘Add New’ and do a search for ‘Twenty Twelve’ and then click on ‘Install Now’ from the results. If you are tied into your existing theme then you can press ahead and wait until it becomes apparent whether it really is a problem or not. A further option is to purchase a theme built for use with WooCommerce.

Creating Your First Product

The plugin has now been setup and your site now has eCommerce functionality. That was pretty easy I’m sure you’ll agree. Now it’s time to the start adding your products to the store.

Now the bad news with WooCommerce is there isn’t an option to mass import products into the system (unless you buy this extension) so you will have to add each product by hand. However, the good news is that creating products is done in almost the same way as creating a new post.

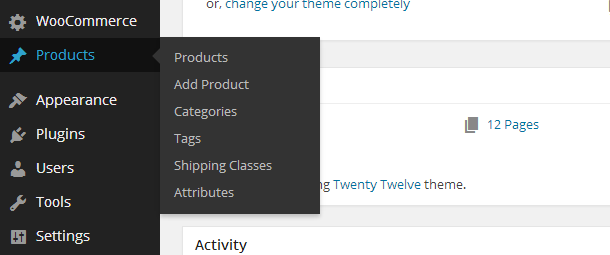
To get started and create your first product, locate the ‘Product’ menu item on the left side menu and then click on ‘Add Product’ from the sub-menu.

Creating a Product

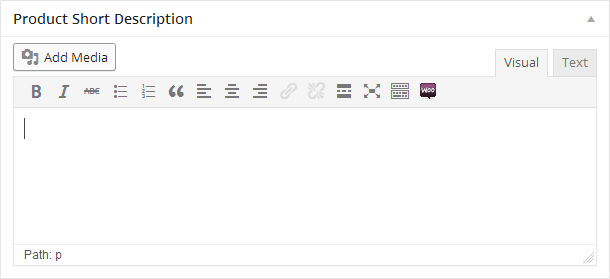
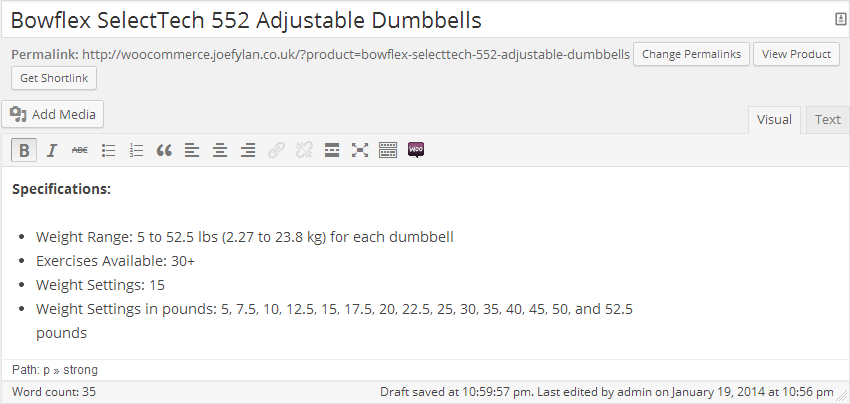
The ‘Add Product’ page should be familiar to WordPress users as it is based on the ‘Add New Post’ page. The main difference is that it contains a few extra meta boxes beneath the main post editor. If you scoll down the page you will see a meta box entitled ‘Product Short Description’.

WooCommerce Short Product Description

This is the area where you should write the product description as it will be displayed at the top of the product page. However, this placement can vary depending on what WordPress theme you are using. To be sure, enter a quick bit of text in this box and hit the ‘Preview’ button in the right of the screen.

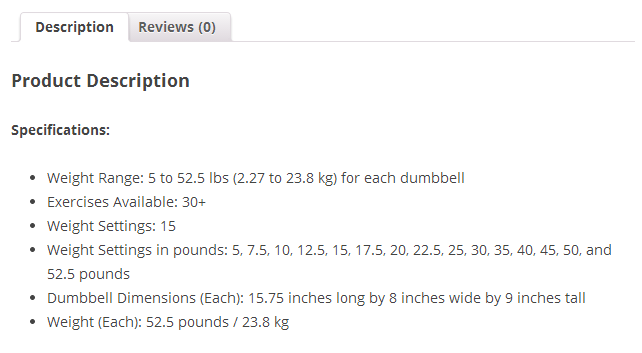
Any information you add to the main editor on the Add/Edit Product page will be displayed further down your published product page, under the ‘Description’ tab. To see this in action, quickly add some text to the main post editor.

WooCommerce Product Description

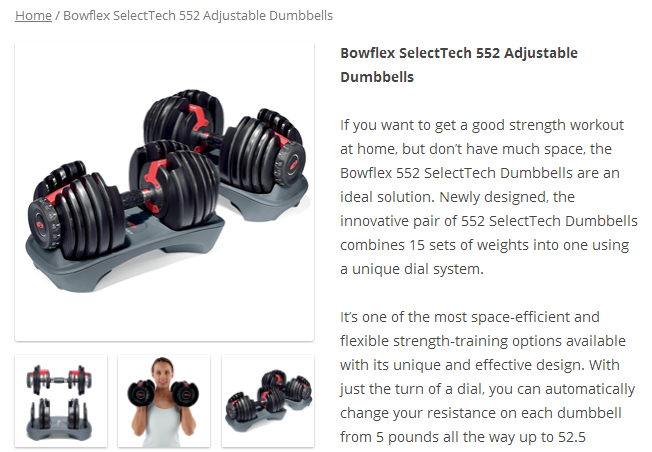
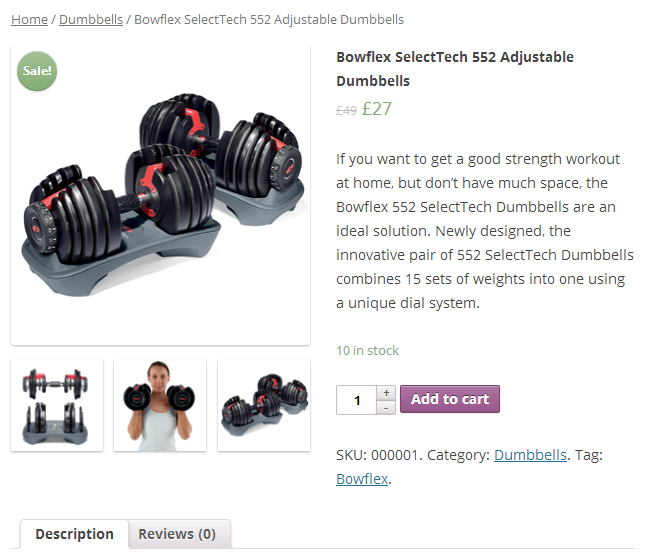
This information, should now be displayed on your product page like so (although again, this can depend on which WordPress theme you are using, for this example I am using the free Twenty Twelve theme):

WooCommerce Product Preview

So now you’ve got a product page that includes the main description, then a further piece of text listing more details about the product. Now it’s time to add the product images.

Adding Product Images with WooCommerce

The first image you want to add should be the one that shows your product in the best light. Once you’ve selected your image, locate the Featured Image box on the Add Product page and click on the ‘Set Featured Image’ text.

Now you can drag and drop the image you want to use into the Media Library or select from an image you’ve already uploaded to your site. This is the image that will be displayed in the product listings pages and also as the main image on the individual product page so make sure it’s a good one.

Once the image has been set, you can preview your product to see it in action.

WooCommerce Product Preview 02

Now depending on your theme, you might notice some smaller blank images boxes beneath the image you just added when previewing the product page. WooCommerce allows you to add multiple product images to each product page and this is where they are displayed.

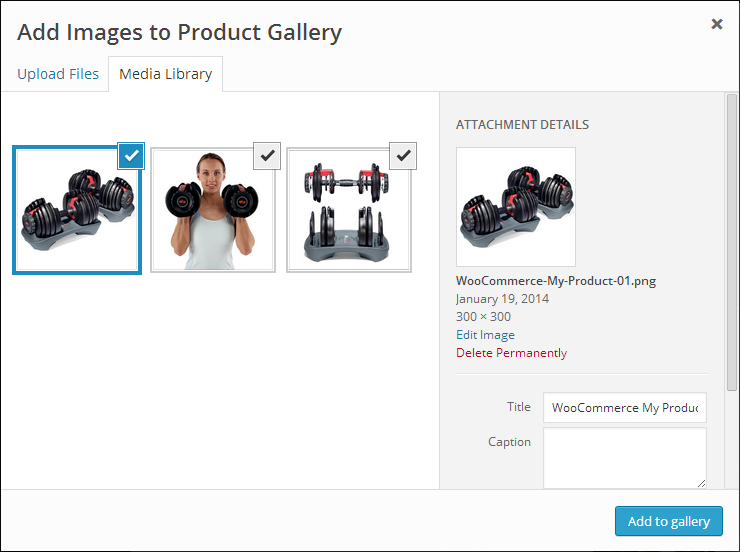
Switch page to the ‘Edit Product’ page and locate the ‘Product Gallery’ box which should be above the ‘Featured Image’ box we just used. Here you can add additional images that can be used to illustrate your product description.

Click on ‘Add product gallery images’ and then upload or select the images as before. You can select multiple images by holding down the Ctrl key when clicking on them.

WooCommerce Product Gallery

You should also give the individual images relevant Title and Descriptions before clicking the ‘Add to Gallery’ button.

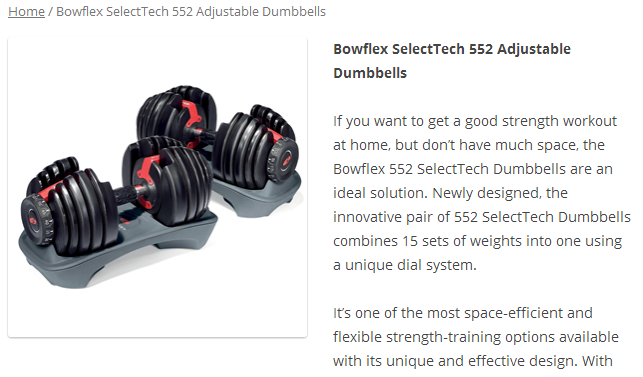
To preview the product gallery you will have to publish the product rather than just clicking the preview button. But when you are ready to publish the product you should see something like this:

WooCommerce Product Preview 03

Due to the way the gallery images are displayed, for presentation purposes, adding three or more images to the gallery is a good idea.

Product Taxonomies

WooCommerce adds its own product taxonomies to your WordPress site. These are the Product Tags and Product Categories. They work like the regular WordPress categories and tags, but they are only shown for products. You will need to think carefully on how you are going to use the product tags and categories as they can be used by shoppers at your store to find products.

One use could be to enter the product type in the category filed and the brand in the tag field. Such as:

  • Product Category: T-Shirts
  • Product Tag: Nike, Running,

With the above approach, a shopper could click on the T-Shirts category on your store and see all the products in that category, and the same with the Nike or Running tags. You can have multiples of each, although best practice often recommends that a product should only be in one category, but can have multiple tags. You can also have subcategories too such as Clothing > T-Shirts.

Whatever you decide, just try to be consistent across all your products. You can go back and edit these at a later date so don’t worry too much at this point.

Product Data

Now that the first product for your online store it taking shape, it’s time to look at the product data.

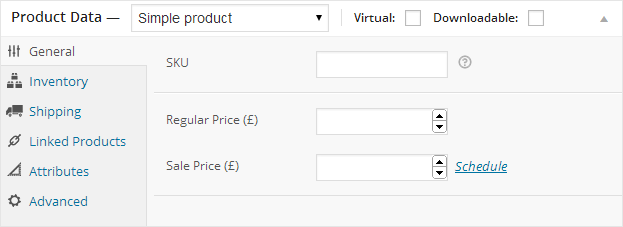
WooCommerce Product Data 01

Here you can enter the information that allows you to run your WordPress eCommerce store, including the pricing details and shipping details. What you enter here will be based on the products you are planning to sell online so once you’d got the information you need about your products, start filling in the fields.

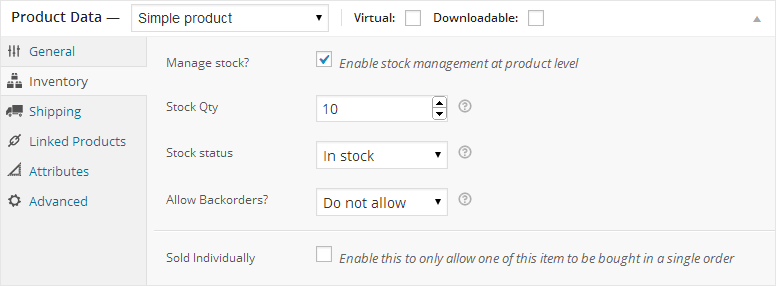
WooCommerce has some pretty good features here such as being able to set a sale price and also the date range for when that reduction will be applied. You can let WooCommerce manage stock levels from the ‘Inventory’ page.

Product Data Options

When you’ve entered the product data, such as price and quantity you have in stock, the product should be ready to go.

Product SEO

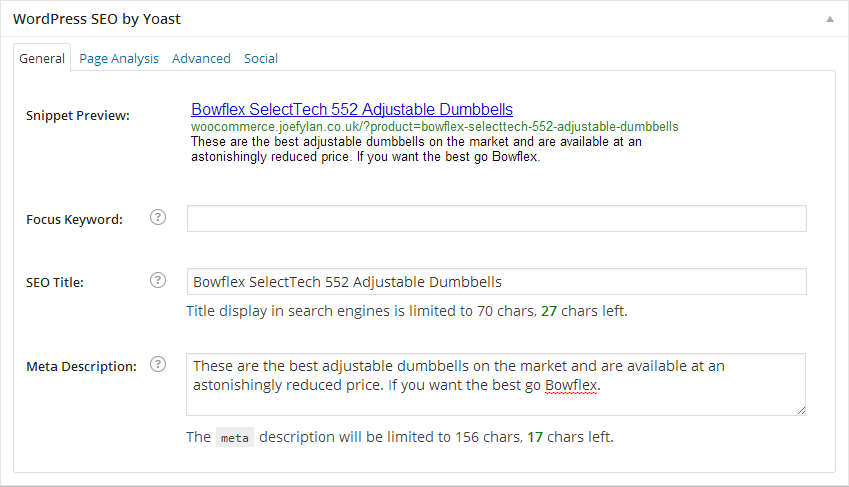
If you are using an SEO plugin such as WordPress SEO then you can add some additional information to your product that will be displayed in the search engine results pages when someone is using Google to find a product that you sell. This is worth doing for each product and can increase the number of people who find your store when searching online.

WooCommerce SEO

Just fill in the ‘SEO Title’ and ‘Meta Description’ fields and you should be done. The former is used for displaying a title for your site in Google, while the latter is what is displayed as the snippet underneath the title in the Google listings. The more interesting and compelling you can make the description, the more likely a searcher will click through to your site and maybe purchase something.

Publishing your First Product

With everything setup, you should now be ready to publish your product and make it live. You can edit any of the product details later or even un-publish a product so changes can be made in the future.

To set your product live, locate the ‘Publish’ (or Update) button at the top right of the screen and press it; congratulations, you’ve just created your first eCommerce store with its own product.

Example of WooCommerce Product

Managing Orders

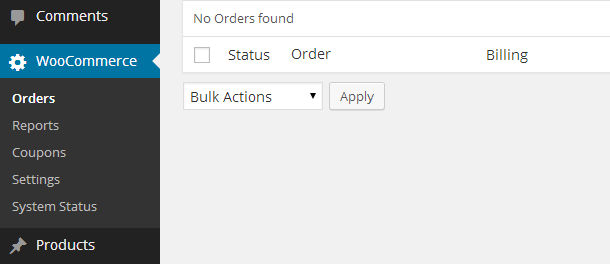
WooCommerce makes it very easy to track orders made at your store. Simply go to the ‘WooCommerce’ menu on the left side menu of your admin area and then click on the ‘Orders’ sub-menu item.

Manage Orders with WooCommerce

From there you can see any orders that have been made and then do what is necessary to fulfil them such as shipping them out. Out of the box WooCommerce can handle basic payment collection using PayPal so once and order has been completed you can do your part of the transaction.

WooCommerce Settings

From the Settings sub-menu, you can configure how you’d like your store to function. There are a lot of options and settings but they are all pretty self-explanatory and are well-documented with tooltips that provide additional information.

Tooltip Example

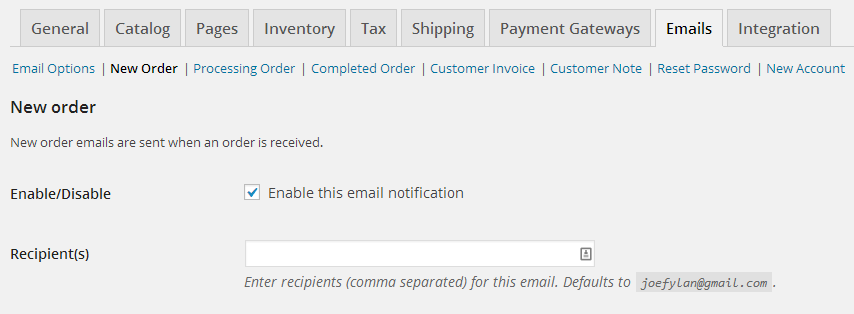
One setting you might want to enable right from the outset is the new order email notifications. To set this up, click on the ‘Email’ tab and then click on ‘New Order’ from the sub-menu.

Enable the option and then enter your email address. Now you will get an email when a customer makes an order, allowing you to respond as soon as you can.

Setup Email Notifications

And that is it. You should now have an online store setup with at least one product that can manage orders and accept payment via PayPal.

Conclusion

As you can see, WooCommerce is very easy to setup. It has all the features you need for building a basic online store, without outlaying any money. For the extra functionality that is required for creating an advanced eCommerce store, there is a large selection of extensions available that bring professional web store features to your WordPress-powered shop.

If you have any questions about setting up your first online store with WordPress, please leave a comment below or get in touch.